Pinterest
Verification In 10 Easy Steps
Getting verified on Pinterest
is a great way to let your followers and
viewers know a little more about you. Anyone interested in your services or
wanting to know a little more about you or what you do can now click directly
on your verified website or blog link. Take the time to verify your site. This
lets people know you own your site and that it’s safe to be redirected to your
link. Trust is a big deal when dealing with so much spam and viruses. Pinterest must first verify your own or
manage the site before it will allow you to display your link for all their
users to see and be redirected to.
Once verified, your Pinterest account will display your full
website URL and a checkmark next to your URL.
Let’s get verified!
First you need to
make sure you can access your website server. You will be required to upload a
unique HTML file to your hosting site. For example: GoDaddy.com. Don’t be intimidated by the fact
that you have to access your server and upload an HTML file. No need to call
your programmer, web guy or expert. You can absolutely do it yourself with the
instructions below. Try our steps below and save your money. If you have GoDaddy.com as your website or blog host,
this is exactly how you would get verified.
1) Make sure your
website is listed on your account under your Settings page.
2) Press the ‘Verify
Website’ button. The instructions will appear. See example provided by Pinterest.

3) Press the
‘Download the HTML verification file’ link to download your unique Pinterest verification file.
4) Login to your GoDaddy.com account. Once logged in, click on
‘My Account’ in the upper left corner.
5) Click on ‘Web
Hosting’ and then ‘Launch’ next to the website you want to verify with Pinterest.
6) Click on ‘FTP File
Manager’ from the top menu.
7) Now click on your
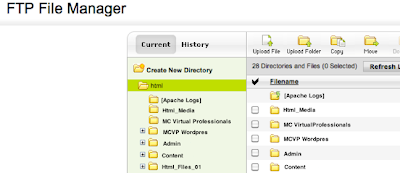
root folder, this is the highest-level folder, on the left menu.
For Example: Our folder is the
folder labeled “html”. See image shown:

8) Click ‘Upload
File’ from the top menu.
9) Click ‘Choose
File’ button and select the HTML verification file you downloaded from your Pinterest account. Press yellow ‘Ok’ button
and logout from your GoDaddy.com account.
10) Complete the
verification process by clicking the bold ‘Click
here’ link.
Pinterest will now ensure that you
uploaded the HTML file. Once the file upload has been verified Pinterest will verify your website. You should see a success message if
everything was done properly and you’ve been verified. Your profile page will
now show your website and a checkmark next to it. Now you will appear as verified
and a trusted link!

No comments:
Post a Comment